What Is Nesting Software? A Guide for Laser and CNC Shops
Nesting software lays parts out on a sheet by their real outline so less material is wasted. What it does, how it works and how to test one on your own parts.
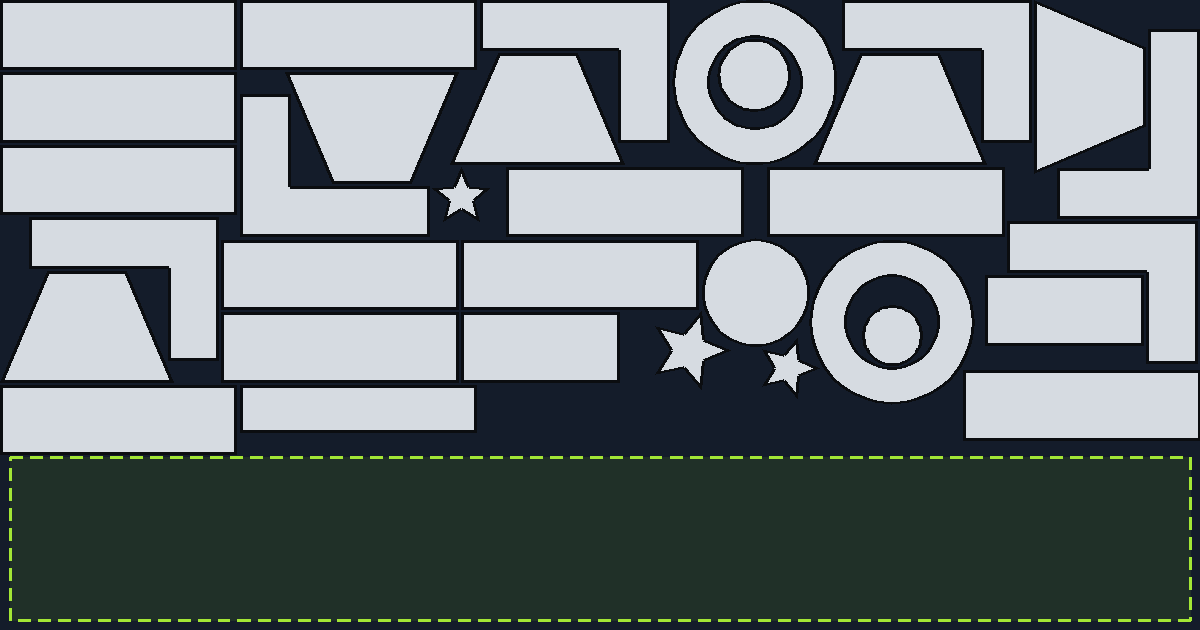
Nesting software arranges the parts you need to cut onto sheet material so that as little of the sheet as possible is wasted. It reads the part outlines from SVG or DXF files, applies the rules of your machine (kerf, part gap, sheet margin, allowed rotations) and returns one layout per sheet that you send to the laser or CNC. On mixed-part jobs the difference between a hand layout and a good automatic nest is typically 10–25 % of the sheet, and that material is paid for whether it is cut into parts or thrown away.
What nesting software actually does
A nesting program takes three inputs and produces two outputs. The inputs are the parts with their quantities, the sheets you have (size, and ideally which ones are in stock), and the process rules of the machine. The outputs are a cut file per sheet and a report of what was placed, what did not fit and what is left over.
In practice the job runs like this:
- Import the parts from SVG or DXF and set the quantity of each.
- Pick the material and sheet size, or a list of sheets and offcuts that are available.
- Set kerf, part gap, sheet margin and rotation rules for that material.
- Run the nest. The software tries thousands of orders, positions and rotations and keeps the best layout it found.
- Export one file per sheet and open it in the software that runs your machine.
The point of automating this is not only speed. A person laying out 40 parts by hand in a CAD program needs 20–40 minutes and stops as soon as everything fits. The software keeps searching after that and usually fits the same parts into less sheet.
Bounding-box nesting vs true-shape nesting
Bounding-box nesting places the rectangle around each part; true-shape nesting places the real outline. That one difference decides most of the yield, because real parts have notches, holes and slanted edges, and only true-shape nesting can put another part into that space.
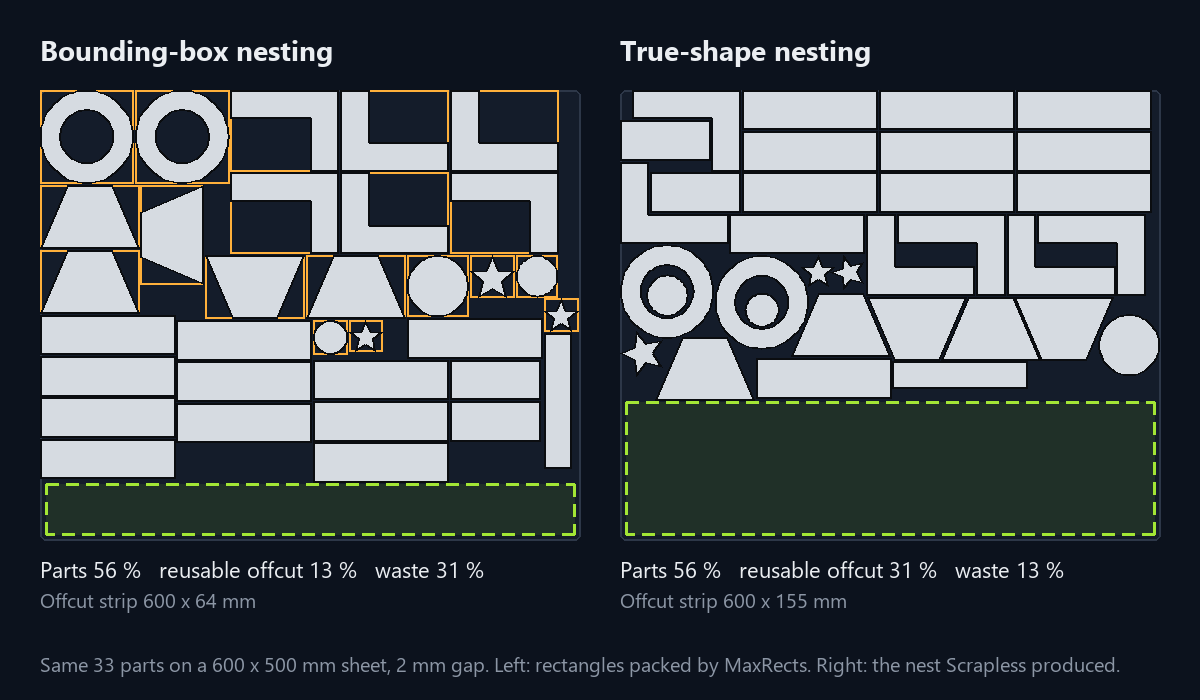
The figure above uses the same 33 parts on the same 600 × 500 mm sheet with a 2 mm gap, so the parts cover 56 % of the sheet in both cases. Utilisation cannot tell them apart; what differs is the leftover. The rectangle packer, a MaxRects packer with rotation, needs 436 mm of the sheet’s height and scatters 31 % of the sheet as unusable pockets, leaving a 64 mm strip at the bottom. The true-shape nest hooks the L brackets into each other, puts the discs inside the rings and tucks the stars into corners, finishes at 345 mm, and leaves a clean 600 × 155 mm strip that goes back on the rack: 31 % of the sheet reusable, 13 % waste. On a real job with organic shapes the gap between the two methods is usually larger, not smaller.
| Bounding-box nesting | True-shape nesting | |
|---|---|---|
| What is placed | The rectangle around each part | The actual outline |
| Parts interlock | No | Yes, L, C and slanted shapes pair up |
| Parts inside holes | No | Yes, small parts go into rings and frames |
| Waste between parts on mixed jobs | 25–40 % of the sheet, scattered | 10–20 %, and the rest stays in one strip |
| Where you find it | Array and grid tools in machine software, spreadsheets | Dedicated nesting software, free nesters such as SVGnest and Deepnest |
Rectangular parts are the exception. If everything you cut is a rectangle, a grid is already a true-shape nest and the software only saves you the typing.
How nesting algorithms work, in shop terms
A nester has two jobs: deciding where a part can go without touching anything already placed, and deciding in which order and rotation to try the parts. The first job is geometry, the second is search, and the quality of a nesting tool depends on both.
The geometry part is usually built on the no-fit polygon. For a pair of shapes A and B, the no-fit polygon is the outline that B’s reference point must stay outside of so that B does not overlap A. Once the software has that outline it can slide B along it and test candidate positions quickly. Bennell and Oliveira’s tutorial on the geometry of nesting problems is the standard reference if you want the details.
The search part decides the order in which parts are placed and which rotation each one gets. Most tools use a genetic algorithm or a similar heuristic: try an order, measure the result, keep the better orders, mutate them, repeat. That is why a nester gets better the longer it runs, why two runs of the same job can give slightly different layouts, and why the run time grows with the number of distinct shapes rather than with the number of parts.
Two consequences matter on the shop floor. First, gap and kerf are part of the geometry, so changing them changes the whole nest, not just the spacing. Second, a nest that took two minutes is not “wrong” because a second run found a better one; give jobs with many distinct shapes more time.
What the software needs to know about your machine and material
Kerf, part gap, sheet margin and rotation rules are the four settings that decide whether a nest that looks good on screen also cuts correctly. They depend on the process and the material, and they should be stored per material, not typed in per job.
| Process and material | Kerf, typical | Part gap, starting point | Rotation |
|---|---|---|---|
| CO2 laser, 3 mm acrylic | 0.1–0.25 mm | 1–2 mm | Free |
| CO2 laser, 6 mm plywood | 0.2–0.4 mm | 2–3 mm | Follow the face grain if it shows |
| Fibre laser, 1–3 mm mild steel | 0.1–0.3 mm | 2–4 mm | Free, unless brushed or grained |
| CNC router, 18 mm plywood, 6 mm bit | 6 mm (the bit) | Bit diameter plus 3–4 mm | Follow the grain for visible parts |
| Plasma, 6–10 mm steel | 1.5–4 mm | 6–10 mm | Free |
These are starting points as of 2026; measure your own kerf on a test cut before trusting any table, including this one. The DXF nesting guide shows how to measure it and what the numbers mean for the file.
Sheet margin is the distance from the sheet edge to the first cut. It covers the sheet not being perfectly square, clamps and hold-downs, and the edge zone where a laser bed is not flat. Values of 3–10 mm are common.
Manual vs automatic nesting: when each is enough
Manual nesting is fine for a handful of rectangular parts or a single part repeated across the sheet. Automatic nesting pays as soon as the parts are mixed, the quantities are in the dozens, or the person doing the layout is also the person running the machine.
| Job | Hand layout | Automatic nest |
|---|---|---|
| One part, repeated | Grid it in the machine software | No gain |
| Up to about 10 rectangles | Fine | Small gain |
| 20–100 mixed shapes | 20–40 minutes, first fit | 1–5 minutes, keeps improving |
| Parts with holes big enough for other parts | Rarely used by hand | Used automatically |
| Several sheet sizes or offcuts to choose from | Guesswork | Compares them |
| Same job again next month | Redo it | Rerun it |
The cost side is simple arithmetic. A shop cutting 40 sheets of 6 mm plywood a month at €45 a sheet spends €1,800 on that material. Improving utilisation by 10 percentage points on mixed jobs saves 4 sheets, or €180 a month, before counting the operator’s time.
Free and paid nesting tools: what to expect
Free nesters do true-shape nesting and nothing else; paid tools differ mainly in speed, control over process rules, and what happens around the nest. Both are worth knowing.
- Free, open source. SVGnest runs in the browser on SVG files and Deepnest is a desktop version that also imports DXF. Both use the no-fit polygon and a genetic search. They are good for testing whether true-shape nesting helps your parts at all. Expect long run times on large jobs, limited control over rotation and grain, and no memory of sheets or leftovers between jobs.
- Machine software. The program that drives your laser or router often has an array or grid function and sometimes a basic nester. Check whether it places outlines or rectangles; many place rectangles.
- Industrial nesting suites. Tools such as SigmaNEST and ProNest are built for fabricators running several machines, with machine-specific post-processors and licensing to match.
- Standalone desktop nesting. Tools in this group nest by true shape, run on a normal PC, and add what a shop needs around the layout: materials, stock, offcuts and cost per job.
Whichever group you look at, test it on your own files. Nesting quality on a demo set says little about your parts.
Nesting is half of material cost: what happens to the leftover
A nest that wastes 15 % but leaves a clean rectangular remnant is often better than one that wastes 12 % and leaves a comb of thin strips. The first remnant is a sheet for the next job; the second is scrap. Utilisation alone does not show this, so look at the leftover as well as the percentage.
The leftover only has value if you find it again. That means recording it with its real outline, its material and thickness, and offering it before a fresh sheet the next time that material is nested. Doing this on paper or in a spreadsheet works for one person and breaks with two. Scrapless was built around this loop: it nests by true shape, saves what is left on each sheet as an offcut with its outline, and offers those offcuts before new stock on the next job, with stock and material costs shared across the team.
How to test a nesting tool on your own parts
Run one real job through the tool, on the sheet and material you actually use, and compare six things. Any tool that cannot pass this test on a mixed job is not going to pay for itself.
- Take a job with at least 20 parts and at least five different shapes. Export it as SVG or DXF.
- Set the same sheet size, kerf, gap and margin you would use by hand.
- Note sheets used and utilisation. Compare them with your current layout of the same job.
- Note how long the run took and whether a longer run improved the result.
- Open the exported sheet in your machine software and check a known dimension. A 100 mm part must be 100 mm.
- Cut one sheet, measure two parts, and look at the leftover. Is it something you would keep?
If you want to run this test in Scrapless, the 14-day trial needs no card and includes every feature.
Frequently asked questions
What is nesting in laser cutting?
Nesting is arranging the parts of a job on a sheet so that they cut with the least waste. In laser cutting it also means respecting the kerf, keeping enough gap between parts for the heat, and keeping a margin from the sheet edge. Nesting software does this arrangement automatically from the part outlines.
Does nesting software work with DXF files?
Yes. DXF and SVG are the two file formats nearly all nesting software reads. The file has to contain closed contours in known units; open lines, duplicate lines and unitless drawings are the usual reasons a DXF nests badly. The DXF nesting guide covers the checks.
Is free nesting software good enough for a small shop?
For finding out whether true-shape nesting helps your parts, yes. SVGnest and Deepnest produce real interlocking nests. For daily production most shops outgrow them on run time, rotation and grain control, and because nothing is remembered between jobs: sheets, offcuts and material costs stay in your head or a spreadsheet.
What is a good material utilisation percentage?
For rectangular parts 80–90 % is normal. For mixed organic shapes 60–75 % is good and anything above 80 % is unusual. The number depends more on the shapes than on the software, so compare utilisation between tools on the same job, not against a general target.
Does nesting software control the laser or CNC?
No. Nesting software produces a layout file per sheet. You open that file in the program that drives the machine (LightBurn, RDWorks, Ruida panels, the CNC’s CAM software) and cut from there. The nesting tool does not need to know which machine you have beyond kerf, gap and rotation rules.
Key takeaways
- Nesting software places part outlines on sheets; true-shape nesting is what saves material, bounding-box nesting is not.
- The engine is geometry (no-fit polygons) plus search (genetic algorithms); longer runs and correct kerf and gap settings give better nests.
- Store kerf, gap, margin and rotation rules per material and measure the kerf yourself.
- Judge a nest by sheets used and by the shape of the leftover, not by the utilisation percentage alone.
- Test any tool on one of your own mixed jobs before deciding.